
Plantation Grandeur Rises at a Home's Back Addition
September 22, 2019
“Often farm homes needed to look striking from the front, and then whatever occurred on the back just occurred,” says architect Cameron Scott. The hodgepodge he struck along the back of his customers’ house in Jackson was no exception. When the house was constructed in 1904, another smokehouse had served as the place where servants could prepare the dishes. Haphazard renovations over the decades clumsily attached the abandoned smokehouse to the main home and added a cramped and dark galley kitchen elsewhere in the back of the main residence. The current owners needed a kitchen that could serve as the heart of the house, where they can prepare their foods, eat, relax and spend some time together.
Scott made a gorgeous 1,000-square-foot addition which gave the back facade a symmetrical and elegant look worthy of the plantation house’s grand style. Porch and A kitchen give a modern-day living space. Extending the back facade’s new formal style, he also sited and made a brand new garage with the home, providing room for elegant Southern gardens between.
The facade in front of the house, constructed in 1904, is quite impressive.
CHEATHAM FLETCHER SCOTT ARCHITECTS
Out back the structure on the left was previously a detached smokehouse.
CHEATHAM FLETCHER SCOTT ARCHITECTS
After Scott, of Cheatham Fletcher Scott Architects, came on the scene, a random walkway attached the smokehouse to the main house. Now the transition is smooth; the hip roof portion on the ideal side of this photo is your original smokehouse; the rest of the roofline is all the newest accession.
Scott used the smokehouse’s hipped roof as inspiration for renovating the entire back of the house. He mirrored the roof construction on the other side to make symmetry and extended the kitchen in the back of the main house into the smokehouse and supporting the new screened-in porch.
Also, the renovation created a formal plan which connects the main house to a different garage. The brick route marks the axis in the back of the house to the garage.
CHEATHAM FLETCHER SCOTT ARCHITECTS
The brand new roof on the right contains a large screened-in porch which wraps the side of the home.
Historical details were closely matched to make the new structure appear original. These include a timber balustrade which matches with the one on the roof, a painted tin roof, shiplap siding, windows and shutters.
CHEATHAM FLETCHER SCOTT ARCHITECTS
Within the last 150 decades, the kitchen had evolved from the original smokehouse into a cramped galley in the primary house. The brand new addition creates the kitchen the true heart of the house.
CHEATHAM FLETCHER SCOTT ARCHITECTS
A huge island with counter-to-ceiling cabinets on each end separates the utilitarian zone in the kitchen. This helps hide the food-prep mess in the kitchen that is open.
CHEATHAM FLETCHER SCOTT ARCHITECTS
CHEATHAM FLETCHER SCOTT ARCHITECTS
There is a comfortable lounge place at one end of the room, which abuts the new screened-in porch. The knee wall on the right separates the breakfast nook, which occupies the old smokehouse area. French doors on the ideal lead to the backyard.
The brand new screened-in porch wraps around the side of the kitchen also goes down to an office in the main house.
CHEATHAM FLETCHER SCOTT ARCHITECTS
The porch’s painted pine floors contrast with the white paint, although the stylish roof allows for an intriguing ceiling. Beadboard lends a historical look to the ceiling, making the porch seem as though it has always been there.
CHEATHAM FLETCHER SCOTT ARCHITECTS
The couple now enjoys views of the new formal backyard from this end of the porch.
CHEATHAM FLETCHER SCOTT ARCHITECTS
The office at the conclusion of this shooter also includes access to the side porch.
CHEATHAM FLETCHER SCOTT ARCHITECTS
The ideal half of the plan shows the reach of the renovations.
This photo was taken in the doorway into the new garage and shows off the axial plan of the backyard. A round garden and fountain occupy the space between the garage and the main home, together with the brick route serving as a strong axis connecting the two.
CHEATHAM FLETCHER SCOTT ARCHITECTS
The route extends up a few terraces to some new three-car garage. Boxwood hedges and brick walls define the space, while crape myrtles include shade, sculptural forms and flowers.
CHEATHAM FLETCHER SCOTT ARCHITECTS
The new garage takes its style cues from the main home, including the painted tin hip roof along with colonial style.
CHEATHAM FLETCHER SCOTT ARCHITECTS
The garage’s second floor is a big guest suite complete with a kitchenette and wood-burning fireplace.

Get Spring-Like Hyacinth Blooms All Winter Long
September 19, 2019
Sure, hyacinths blossom naturally outdoors during springtime, but you can also fool them into flowering indoors in the dead of winter. Forcing bulbs isn’t reserved for growers. The indoor gardener can have a steady supply of stunning and fragrant blooming hyacinths from late December through April with only a little work. Here’s how.
Kaylovesvintage
Clusters of pastel blooms that emit a sweet fragrance characterize hyacinths. They have relatively short leaves and therefore can be placed in specialized forcing vases, such as the ones shown here.
LLC, Sheila Rich Interiors
Choosing bulbs. By mid-October it’s advised to buy bulbs which aren’t prechilled. If you are beginning in September or early October, buy the best-quality prechilled (ready) bulbs you can get which are big and blemish free. Make sure they’re firm and free of mould.
Storing bulbs prior to potting. Manage bulbs carefully constantly. They should not be dropped or exposed to extremely high or low temperatures. While it is preferable to pot recently bought bulbs right away (particularly prechilled bulbs), bare bulbs can be stored for several weeks in cool, moist sand till you are ready to induce them.
Keep the bulbs at a place with temperatures between 45 and 50 degrees Fahrenheit. Temperatures over 63 degrees must be avoided at all times prior to planting, so based upon your climate and time of year, fridge storage may be the perfect thing to do.
Place the bulbs in a mesh or paper bag with holes for ventilation. You can save them into a vegetable or skillet in your fridge, but don’t store them in precisely the exact same drawer as ripening vegetables or fruit, which give off ethylene gas which can damage the bulbs. Check them occasionally to make sure they aren’t molding or drying out.
Warning: Many bulbs, for example hyacinth, are toxic, so the fridge storage method is not recommended for families with young kids. Additionally, hyacinths contain oxalic acid, which can cause skin irritation for some people. Before planting, make sure you thoroughly wet the bulbs to decrease the impact of this oxalic acid, and also use gloves for protection.
Gardening with Confidence®
How to Force Hyacinth Bulbs
There are a couple of ways to induce hyacinth bulbs. I’m going to tell you about the water method, the dirt method and my simple (although not optimal) method. I favor the latter, however some may find that the other traditional approaches are more dependable.
The simple (although not best) way. This is great for people who reside in warm climates. It works best for Lady Derby or Gypsy Queen bulbs, each of which are known to induce readily.
Store the bulbs in a paper bag in your refrigerator for eight to ten weeks (again, in a place protected from ripening fruit).
Place the bulbs in vases or on a bed of stones in water, as you would for other bulbs.
Place the vases at a place with bright indirect light and give the plants more light as they grow roots and leaves.
Though many experts will tell you hyacinths won’t bloom indoors unless they origin in 48 degrees or below through a frightening period of eight to 16 weeks, experience has taught me this isn’t necessarily the situation. My results may have not been best — the flower stalks did are short — but we appreciated fragrant and lovely flowers.
Note: Among the downsides to using forcing vases is the stalks can weaken and fall over until the blooms have opened completely. In the absence of dirt, tie a flat bamboo skewer to the side of this forcing vase for support, or just liquefy the plant from a wall.
Kaylovesvintage
The water method.
Use forcing eyeglasses, vases or containers which can hold the bulbs only over the water and allow room for root growth below. Pick vases which won’t tip over when the big blossoms bloom.
Place a bulb in your container and then add water until it just reaches the base of the bulb. Change the water once or twice per week by tipping the liquid out and replacing it with fresh, lukewarm water.
Place the bulbs at a place that’s cool (40 to 55 degrees) and dark until the roots develop and leaves begin to sprout. Bulbs which were prechilled will show growth in about a few weeks, whereas routine bulbs take eight to 16 weeks.
Note: The temperature through this rooting period is crucial: 40 to 48 degrees is best. You can theoretically root bulbs in your fridge if you have a thermometer. Basements and garages often offer the ideal conditions.
Once the foliage starts to develop, move the bulbs to a warmer place (65 degrees). Some growers urge a bright north-facing window, but some specify bright light but not direct sunlight.
Switch the vases every day to avoid leaning, and change the water regularly. After about two additional weeks, you ought to have stunning, fragrant blossoms that can last another two weeks or so in a cool place.
Once the blooms have browned and expired, throw out the bulbs. Water forcing utilizes every scrap of electricity a bulb offers, hence the bulbs won’t rebloom.
Rossington Architecture
The soil method. Use clean 4- to 8-inch diameter baskets with adequate drainage holes. If they had been formerly used, wash and wash them thoroughly. Make sure the holes at the base of fresh plastic pots are open. Should you use clay pots, soak them overnight in a bucket of water so they won’t draw moisture from the planting medium.
The planting medium anchors the bulbs and retains moisture. It must be well draining and yet maintain adequate moisture for growth. A good example of a acceptable planting medium is really a sterilized mixture containing equal portions of loamy soil, peat and sand. Fertilizer should not be added to the mix.
Tamar Schechner/Nest Pretty Things Inc
Add dirt to the base of the kettle, then place three or four bulbs in an 7-inch kettleplant or plant a single bulb at a 4-inch pot. The bulb shirts must show above the soil. Do not press on the bulbs to the planting medium; it should be loose so rooting can take place quickly. Do not overfill the pot. Fill it just to inside 1/2 inch of the surface so the plants can be easily watered.
After planting, water the pots thoroughly and place them in a fridge that’s 35 to 45 degrees, or in a place with a similar temperature range. A cold, dark basement room, basement or garage would work well. Keep the medium moist throughout the rooting and cooling period. After five to six weeks, roots must grow out of the holes of their containers, and shoots will begin to emerge from the very top of their bulbs.
After having a minimum of 10 to 13 weeks of cold treatment, the first bulbs could be placed in the home. Longer cold storage will result in taller flowers, whilst storage intervals shorter than 10 to 13 weeks will likely result in more compact plants and at times aborted or malformed blossoms. For a constant supply of flowering flowers, fill as many pots as you have room to put away during cold treatment, then bring a few pots indoors at weekly intervals.
Place the pots in a 60-degree place with subdued lighting to get a week or two until yellow sprouts at the peak of the bulb turn green.
Transfer the pots to a brighter, slightly warmer place, like a windowsill, but avoid direct sunlight for best results. Continue to keep them at a relatively cool place to mimic temperatures outdoors in early spring, and also remember to flip the pots slightly every day so the stalks will grow right back.
Once the buds open and the plant is in full blossom, proceed to a somewhat colder place without direct sunlight to prolong bloom life. Display flowering plants during the day when you can enjoy them then move them in to your coldest room at night to preserve the blooms.
sherry hart
Care of bulbs later blooming. As mentioned before, bulbs made in water will very seldom have the capability to blossom again. Bulbs forced in dirt, however, can possibly blossom again, though the blooms won’t ever match the beauty of the first ones, so most seasoned anglers choose to throw them. Or you can proceed as follows:
once the blooms turn brown and die, cut the stalks off in the bottom but continue to take care of the plant using frequent watering. Come spring, plant your bulbs outdoors, where they will often recover and blossom again, though not always another year, rather than using the identical vigor. If you don’t have room in your garden for the outcast hyacinth bulbs, or you don’t have a garden, just remove your bulbs and start again next year with fresh bulbs.
More: learn to induce narcissus and amaryllis bulbs too.
Great Escape: A Tiny Hideout in the California Woods
September 16, 2019
Looking down from the top of the hill, you won’t find this tiny house at first glance. The 90-square-foot construction is tucked on a tiny ledge overlooking the Pacific Ocean, coated with redwood bark along with a dwelling roof to blend in with all the coastal California hillside. The clients’ most important house is higher up the mountain, however they wanted designer Alex Wyndham to design a special off-grid place for their adolescents.
Wyndhamdesign
The hideout’s folding glass front doors and hinged side walls available entirely, exposing the house to cool breezes along with the ocean view. “You can observe whales swim by while lying in bed,” says Wyndham.
Wyndhamdesign
“Usually when you go to a site, you clear the site. In the end, it will become a detriment to the landscape,” Wyndham states.
Wyndhamdesign
Wyndham seeded the roofing using a mixture of California poppies, silky lupines, baby blue eyes and many native grasses.
Wyndhamdesign
The dwelling roof’s indigenous wildflowers and grasses increase the natural habitat for local pollinators. Eventually, the ocean wind will blow the seeds off the roof and then disperse them down the hillside.
Wyndhamdesign
The living roof functions with the main home’s layout, also. “The slope is so intense, and the main house is over,” states Wyndham. “A green roof makes it so that you can’t find the tiny house very nicely. It’s only a tiny square of flowers.”
More about dwelling roofs
Wyndhamdesign
Salvaged redwood bark covers the structure’s walls. A nearby lumber mill had intended on burning piles of this leftover bark from felled redwood trees, therefore Wyndham snagged the substance for free.
Wyndhamdesign
The bark acts like a rain screen over the interior plywood walls. Wyndham carefully trimmed 18-inch-wide bits from the large slabs of bark, placing them side by side for a continuous, seamless appearance.
After installing the siding, Wyndham cut on the back part of the walls at an angle, installing hinges so that the walls can lift up and out for ventilation. When the walls have been closed, a peephole in 1 wall makes for a clear view of anyone coming down the hill.
Before Photo
Wyndhamdesign
Here is a snapshot of the house in structure. Wyndham oriented it to optimize active and passive solar practices. The arrangement faces southwest for a perfect sunset view. The roof overhang along with a sizable nearby tree shade it in the summertime. In the winter the house is totally exposed to sunlight. The double-pane 5 and windows inches of dirt on the roof assist moderate the temperature.
The getaway is completely off the grid, lit only by candles at night. Finally, Wyndham plans to install a simple solar panel and LED lighting.
We would really like to see that your creative getaway. Please post a picture in the Remarks!
Next: More backyard getaways

Get the Hang of Hanging Flower Baskets
September 13, 2019
Who does not love a hanging basket filled with a profusion of foliage or blossoms? This sort of container gardening is a magical addition to your deck, patio, arbor or deck and it’s simple, as long as you know a few tricks of the trade. Below are some ideas on planting your hanging baskets and maintaining them lush and flourishing all year.
Liquidscapes
The Fundamentals. Hanging baskets can be created using plastic hanging planters, wire baskets lined with cherry cubes, rattan baskets or perhaps glazed pottery containers with attached hooks. There isn’t one appropriate substance to use — it’s mostly about aesthetics and the look you are trying to create. Keep in mind, however, that each kind of container may result in varying watering programs, as the soil dries will probably dry out differently in each.
Rebekah Zaveloff | KitchenLab
Nearly any kind of smaller plant which may be grown in the floor may be utilised at a hanging basket. The crops that typically appear the best, however, are the ones which have a soft downward observation or mounding habit as opposed to a stiff upright growth pattern. Elect for crops such as ivies, pothos, ferns, succulents, vines and annuals such as petunias, impatiens, geraniums, calibrachoa, lobelia and fuschias.
Avoid plants with an extensive root system, shrubs and trees — even if they are dwarf — and plants which are too large, as hanging baskets are inclined to be 1 foot to 2 feet in diameter. Also avoid those that have very particular or catchy maintenance requirements, such as orchids, tillandsias and bromeliads, which would make maintenance an issue.
Travis Knoop Photography
Drainage. Drainage will be very different depending upon what kind of hanging basket material you’re using. Wire containers with cocoa liners will drain almost too freely; hanging pottery can retain too much moisture; and vinyl supplies a joyful drainage medium.
If you’re using cocoa liners, consider putting a plastic saucer at the bottom of the basket prior to adding plants and soil — this can keep some of the water from the dirt, where roots can get it before it drains out.
When employing pottery, add a layer of dirt into the ground before adding plants and soil, water sparingly to prevent rotting and select plants that just like a little extra moisture to counteract the shortage of drainage holes.
I’m not a huge fan of plastic pots, particularly in hanging planters where the bottoms of the plastic pots and the plastic stoves are on display. However, there are a few tricks that I use to disguise them at the event they are the ideal option. I use long trailing plants such as ivy, petunias, calibrachoa and sweet potato vine to pay the plastic kettle, and that I eliminate the plastic hangers and replace them with decorative chains. Just a few minor tweaks may turn a pedestrian plastic kettle into something more attractive.
Rikki Snyder
Watering. The dirt at hanging containers will dry out much more quickly than dirt in your backyard, so be prepared to water daily unless you are using plants that are very dry. Plants which are in more direct sun might even need a twice-daily watering (once in the morning and again in the evening) to keep them well hydrated.
In the event that you inadvertently bypass a day or two and discover your soil is bone dry as well as your plants are wilted, consider the basket down and attempt gradually mowing the planter, repeating several times as the dirt rehydrates. You may need to reduce your wilted foliage and blossoms to reinvigorate plants should they’ve gotten really dried out.
It is possible to hook up drip irrigation into each hanging basket — this option works best if you’ve got a number of hanging baskets in a row to keep irrigated. Tubing hooks up to your water spigot, and emitters branch away the tubing into each basket, providing water efficiently. You will have black tubing that is exposed up the aspect of your porch or terrace post, but so if this kind of appearance bothers you, this may not be the ideal option for you.
Ron Brenner Architects
Fertilizing. Plants which are in any sort of container will require regular fertilizing, particularly if you’re using hungry annuals. Nutrients in the soil leach out much more quickly in containers, which means you’ll need to supplement your crops’ feeding program to make sure their health. Avoid overfertilizing, though, as that may actually harm plants and stop them from blooming. Utilize an all-purpose water-soluble fertilizer or a fertilizer that is formulated for the particular plants you are using. I like to add slow-release fertilizers into the soil at planting time when I’m using heavily feeding annuals; this gives them an excess boost to draw on throughout the growing season.
Fertilizing may be done monthly or, if the solution is combined at half strength, weekly. This is particularly true for flowering annuals, that are heavy feeders. If you are utilizing ferns, succulents or cacti, follow the instructions on the package, but in most instances monthly fertilizing will be sufficient.
Aiken House & Gardens
Planting notes. Make sure to always combine crops which have the same growing requirements for water and sun. You would never plant thirsty impatiens next to a drought-tolerant cactus, do you? While these plants represent the extremes, each plant has its own taste for light and water, so be sure to plan accordingly.
Some experts suggest using a good-quality potting soil in your hanging baskets, while some suggest utilizing outdoor planting dirt. It is important to use dirt that is formulated for the kind of plants you’ll be using — if you’re using cacti or succulents, be sure to use a fast-draining soil mix that is proposed for those kinds of plants, for example. Never use dirt right from your garden bed, however, as this kind of dirt won’t drain correctly in any kind of container.
For a casual, cottage-y appearance, try mixing a variety of leaves and blossoms together in 1 basket, but for a more elegant or modern aesthetic, elect for a single kind and colour of plant . A row of fitting plantings will look much more cohesive than combined plantings, however there’s not any denying the allure of hanging baskets filled to the brim with a lush mixture of tracking flowers.
Frederick + Frederick Architects
Designing. There are a couple of different ways to mimic a designer if putting together your hanging baskets. 1 method is to choose a single plant (purple petunias or asparagus fern, for example) and plant which en masse in each of your baskets. The block of colour and precisely the same planting scheme pack a punch in the distance and look more elegant or modern than combined plantings.
Exquisite Ceramics
If you prefer to use many different crops, however, there’s an easy rule of thumb which designers follow. Go for an upright plant which has some blossoms and bright color (such as red geraniums), then add some tracking blossoms that dampen the edge of the basket (such as lobelia) and finish off with some cascading foliage (like ivy or sweet potato vine). The varying heights, growth patterns and colours create a complete”chunk” of plants which is charming and arresting.
The Secret Formula for Grouping Plants at a Pot
Debra Kling Colour Consultant
Where to hang a basket. The advantages of a porch are an ideal place, as are fencing posts, deck borders and patio covers. Avoid hanging flower baskets at which people may walk into themas in the middle of a ceiling or from entryways to your home or other structures. Always combine hanging baskets on beams or posts which may handle the weight, as watered-in planters are often very heavy. To get a uniform, clean appearance that plays off your home’s design, evenly space out hanging baskets at a porch opening rather than randomly hanging them here and there.
Julie Ranee Photography
Hanging your basket. Plant hooks and brackets are readily available at hardware stores and home improvement stores — make sure to read the weight limitation for each size hook or bracket and purchase according to the anticipated weight of your basket. Most medium-size baskets are not going to weigh more than about 10 pounds, but it’s always good to use hardware which could handle a bit more weight than your planter. Use hooks for crops which will hang from an overhead horizontal structure, such as the edge of a porch, and brackets for plants which will hang out from a vertical construction, like a fence or a wall.
Using a drill with a bit that is slightly smaller than your hook or bracket screw, drill a pilot hole prior to installing the screw. This will avoid cracks or splits in the surrounding wood, and ensure a tight fit, which is important for security. Then push the threaded end of the twist into the pilot hole, turning clockwise to tighten this up until the hook is flush against the ceiling. Use the same process with brackets, except use a drill or screwdriver to tighten the screws into position.
So what to plant? See 6 superstar annuals for baskets and pots
have you got a hanging basket at full glory? Post a photo in the Remarks!
6 Driveway Appears Take Landscapes Along for the Ride
September 11, 2019
Driveways are often the most overlooked part of garden layout, considered more utilitarian than something worthy of our attention; nevertheless we usually travel together them at least two times per day, and they’re frequently both the first and last thing people see. What impression does your driveway give?
Certainly designing homes that flank a driveway or service street can have its challenges, but there are always alternatives which will add the essential style and color to this important area. Slopes, watering issues or just the sheer length of a driveway may seem daunting obstacles when you’re developing a garden. Then there’s the question of how to link the plan and plant palette into the house itself.
These inspirational designs reveal the way to meet such challenges and produce an approach to your house which will be both inviting and memorable.
Rocco Fiore & Sons
1. The Sweeping Driveway
The question: How to create the process interesting and set the scene for what’s to come.
Option A: Produce a park-like feel with a tapestry of plants and lawn that fulfills the paving at times along the way.
Many people would approach the thought of planting a driveway by digging a boundary on each side and incorporating plants. This layout goes beyond that by integrating areas of manicured lawn to give the impact of forcing through a park.
Considering that the plantings are low, they appear to meld with the greater garden, whereas the soft color palette and plant selection indicate lovely, billowing, intimate gardens beforehand.
Every vignette is exceptional, making this drive an excellent garden tour. I doubt visitors will be rushing in either direction with so far to enjoy en route.
Katia Goffin Gardens
Option B: set a rhythm with regularly spaced trees on either side of the driveway, interplanted with a modest-height hedge.
This glorious mass planting of white Annabelle hydrangeas (Hydrangea arborescens ‘Annabelle’) stands from sight, enticing visitors to see where it leads. Although you can still see over these shrubs, there’s a feeling of mystery since the earth plane isn’t instantly visible on the other side.
Zelkova trees flank the driveway and set up a pleasing rhythm while incorporating height to what otherwise may become a monotonous design. Both the shrubs and trees add structure to the garden in the winter as well.
This elegant garden lends itself perfectly to classic architecture like colonial or Cape Cod styles. Yet its elegant monochromatic scheme would work well for an approach to any traditional-style house.
Madson Design
2. The Large Driveway
The challenge: The driveway dominates the property, taking up a substantial proportion of the front garden.
The alternative: instead of using strong paving or poured concrete, add a center strip of grass or drought-tolerant flooring covers. Flank this with big pavers separated in such a way as to make a checkerboard with plants growing in between.
This gives the impact of some other border within the front garden and expands the visual green area, making the driveway obtrusive.
Although bud could be used with this, I’d opt for a tough, low-maintenance, drought-tolerant ground cover, for example elfin thyme (Thymus serpyllum ‘Elfin’, zones 7 to 9) or even miniature brass buttons (Leptinella gruveri,zones 7 to 9). Both of these resist heavy foot and automobile traffic, are evergreen and require neither mowing or fertilizing. Dymondia (Dymondia margaretae, zones 9 to 11) is a good choice for warmer climates.
Perello Building Corporation
3. The Long, Straight Driveway
The question: How to protect against this directly driveway from feeling like a runway once the home isn’t even in sight.
The alternative: Produce an allée of trees to prepare a rhythm and supply vertical interest to divert the eye from the street itself.
Regularly spaced ornamental pear trees (Pyrus sp)behave as mile markers this down long gravel driveway, each pair taking you one step nearer to the destination. Without these trees that the driveway would feel more like a street; their inclusion creates a more relaxed atmosphere.
This crunching gravel driveway approach suggests a formal or perhaps Mediterranean house and garden style, with ease being the key.
Portal Design Inc
4. The Sloped Driveway
The barrier: Creating planting pockets which are easy to control.
Option A: Combine a stepped pathway to one side of the driveway with a series of built in planters between the two.
This layout almost makes me wish I had a bootable drive. It not only solves the issue of planting, but by integrating a series of wide, shallow steps, the designer has made the journey on foot considerably more comfy.
The rectangular and square planters tie in with the theme used for the garage door and windows.
Should you construct raised beds, you can keep the soil surface level, preventing the issue of erosion following a heavy rainfall in addition to allowing for deeper soil to support trees and larger shrubs. For added attention these could always be brightened with seasonal color, yet this very simple approach is in keeping with the overall planting motif of the house.
Troy Rhone Garden Design
Option B: Produce a shallow raised border following the slope and fill it with plenty of seasonal color.
The best challenge with this specific border is preventing the dirt either from slipping on the driveway or being washed. A very simple cobblestone edging provides an easy boundary to plant, while the dense planting creates a mat of roots to maintain the dirt in place.
Weeding sloping gardens isn’t an easy undertaking, but one way to decrease this is by simply covering the soil with more plants. Certainly this homeowner knows that and has created a delightful cutting lawn that provides months of color while also covering the dirt in such a way as to decrease the ability for weeds to take hold.
The Design Build Company
5. The Sunken Driveway
The barrier: The driveway runs parallel to an incline.
The alternative: Build a retaining wall to make a raised patio and a level driveway.
This beautiful design is likely to have drivers actually taking their time. Considering that the plants are elevated, they may be appreciated from within a vehicle a lot more readily than if they were at ground level.
Tiers of shrubs and perennials in a rich color palette set the scene for this Tuscan house; they include blue coral reefs (Agapanthus sp) and purple fan flowers (Scaevola). The retaining wall is capped with flagstone to supply a sitting ledge — obviously the designer knew that this part of the garden would be revisited following the car was parked.
D-CRAIN Design and Construction
6. The Contemporary Driveway
The question: Bring a feeling of contemporary design to the space while maintaining the planting varied yet drought tolerant.
The alternative: Produce a solid geometrical motif, with irregular planting areas dissecting the driveway.
I find the design of this driveway particularly attractive because of its strong grey motif. Wide strips of concrete are all interspersed with cherry blossom. These strips are counter tops, adding a softness into the layout and busting away from the expected straight route to make subtle curves.
By stepping the substances in this way, planting pockets of varying widths and lengths have been created. All these have been filled with an range of drought-tolerant shrubs, perennials and grasses with a crushed stone mulch being applied as a finishing touch. This mulch joins the plants to the driveway itself while still continuing the contemporary style and reducing weed growth.
Take a look at your own driveway with fresh eyes. Perhaps what you believed an insurmountable difficulty is becoming more manageable after seeing these inspirational designs.

Hang Your American Flag With Style and Etiquette
September 8, 2019
The afternoon before my house burned down, I was thinking about flags. It was the end of June, and we had been in the middle of painting our house’s exterior. The front and back and one side have been completed, and that I was closing in about the fourth. It seemed so fresh and bright, and I couldn’t wait to fly a flag or 2, or 20, for the upcoming Independence Day. I was debating what would seem best, but the fire took good care of all that.
We moved back into our new house nearly a year to the day after the fire, however again right before the beginning of July. I was so exhausted that flags were the last thing on my mind, but yet another year then, I couldn’t wait. I’d always loved the look of flags, but it was a means for me to earn a concrete announcement that our family was still home and “still there.”
Alison Hodgson
After great deliberation I decided to hang a 3- by 6-foot pleated fan above our front porch and to line the walkway with 12- by 18-inch flags on sticks. I figured I needed about 10 but managed to find just eight. That is what it seemed like last Memorial Day, and that I believed it was a fantastic start. For the beginning of July, I bought a few more to fill in the path and realized I had enough to go down one side of the drive, and then I bought a lot more to line equally. We had our annual Fourth of July celebration, along with the flags appeared so beautiful and merry I was sad to package them away. I pulled them out for the election in November and intended to one last time do it for Veteran’s Day, but a friend asked if she could borrow them to welcome her son home from Afghanistan, and I was more than pleased to share.
Whether you’re hanging a flag to commemorate or to celebrate, here are few rules of flag etiquette along with some style considerations.
Ronald F. DiMauro Architects, Inc..
If you’re fortunate enough to have a flagpole, you may already know it’s not necessary to reduce your flag every night as long as it’s illuminated; however, the flag ought to be taken out in inclement weather. There are a couple of days when it’s recommended to fly the flag at half staff: May 15, that is Peace Officers Memorial Day; September 11; the Sunday of Fire Prevention Week (early October); and December 7, that is National Pearl Harbor Remembrance Day. For Memorial Day it’s advocated the flag be flown at half staff from sunrise until noon. Other days are occasionally added too; see the Half Staff American Flag Notifications site for updates.
Polhemus Savery DaSilva
Designs for Living
A solitary flag on a porch post is a simple and classic style for any house.
Mary Prince Photography
Over the front door is a fantastic alternative.
Logan’s Hammer Building & Renovation
Priester’s Custom LLC
When displaying more than one flag, the U.S. flag ought to be flown into the viewer’s left, as shown.
Christian Gladu Design
This screen is ideal with the gorgeous symmetry of this house’s architecture.
If you decide to suspend a flag, whether vertically or horizontally, make certain the marriage (the starry part) is in the top left, like this …
Pottery Barn
Painted American Flag – $159
… or even this.
Keep Smiling Home
With enthusiasts and bunting, the matter is style instead of code.
Dewson Construction Company
The most important consideration is scale.
Together with the intricate trim on this porch, the message appears to be “more is more.” As I am a flag maximalist, my preference would be to pump up the dimensions of these flags on the columns and line the whole balcony with fans.
Sara Bates
I love everything here: the 2 flags displayed on the third story, the gorgeous hanging basket and window boxes, along with the fencing covered with fans.
Grant and Power Landscaping
Don’t worry if reddish flowers aren’t your style. You don’t need to fit your hanging baskets or planters with all the flag; it goes with everything.
Studio 1030 Architects
You might need to look twice to see it, but there above the garage is a metallic and modern take on the stars and stripes.
A simple and affordable way to begin is with a few handheld flags stuck into planters, and that may be the ideal amount.
Alison Hodgson
Following is a picture of my 30-plus flags on Election Day last fall.
This season I am debating smaller fans hung out of the tops of my windows, and I am projecting my ideas into the patio and pool area too.
Ehrenclou Architects
Tell us : How and when would you display the flag? If you’re a er from outside the U.S., what exactly are your flag customs?
Watch more tips regarding American flag screen

8 Inventive Kitchen Floor Treatments
September 5, 2019
These kitchen floors look far beyond the standard hardwood that we’ve all gotten used to. These fun floor ideas, from ‘s Kitchen of the Week series, choose sensible flooring to the next level with paint, fresh ways with old fashioned substances, ecofriendly options and much more.
Gaspar’s Construction
1. Striped marmoleum in Seattle. Whilst marmoleum is famous for its durability and low maintenance, this Seattle client chose it as flooring mainly because of its ecofriendly attributes. Bold yellow stripes help break up the dark, open floor.
See more of the kitchen
Fiddlehead Design Group
2. Cheap tile in Minneapolis. Using vinyl tile (VCT) not only cut down on cost, but it afforded this family some exceptional design opportunities. Using three different tile colours, Fiddlehead Design Group created a fresh but traditional plaid pattern, motivated by a cloth the clients love.
See more of the kitchen
Ogawa Fisher Architects
3. Rubber tile in Portland. Flexco vinyl tile flooring may look commercial in certain spaces, but it matches with this kitchen industrial undertones. The individual tiles make planning different-size spaces simple and feel good underfoot.
See more of the kitchen
LA Dwelling
4. Soy concrete blot . The bright countertop is only the start of all of the green things in this particular kitchen. Ecofriendly concrete is completed with a soy-based blot that is long-lasting and completely VOC free.
See more of the kitchen
Three Legged Pig Design
5. Sparkling floors in San Francisco. Terrazzo Crete, a custom polished polished concrete, provides just the ideal amount of visual texture in this space — vulnerable aggregates and fragments shimmer in the sunlight.
See more of the kitchen
6. Layers in an Texas remodel of paint. Rather than substituting the pine floorboards in his quirky Texas kitchen, this homeowner painted them various colors before landing on a final colour of green. As time continues, the various colours will begin to reveal themselves, creating an aged look that will match the remainder of this amazing space.
See more of the kitchen
The Sky is the Limit Design
7. Rock in Vancouver. This amazing nature-inspired kitchen blends several types of rock to make a exceptional flooring layout. Pebbles break up the traditional limestone tile design, washing throughout the space like a tide of water.
See more of the kitchen
Actual-Size Architecture
8. Cork tile in San Francisco. Tongue and groove walnut planks, completed with a simple clear blot, line the floors of the historic Queen Anne kitchen. Not only does this substance feel good underfoot, but it also patinates superbly, which will add to the 120-year-old kitchen’s storied feel.
See more of the kitchen | Learn about flooring stuff

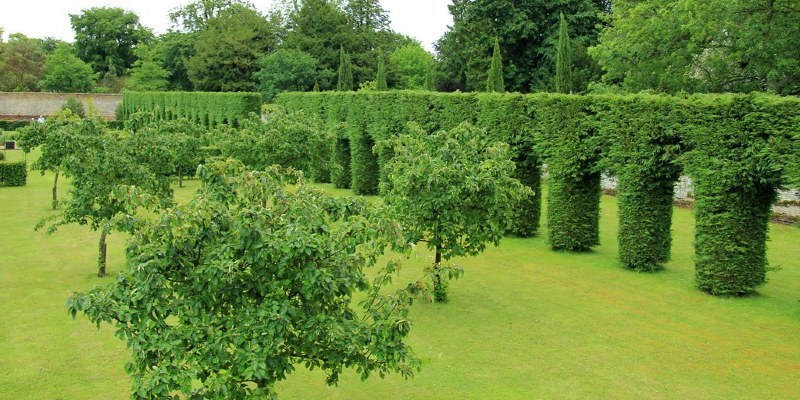
Food and Community Thrive at a U.K. Allotment Garden
September 3, 2019
When landscape designer Laara Copley-Smith spends a Sunday afternoon in her vegetable garden, she does not step in the backyard. Instead she tucks into her plot of community garden — known as an allotment in the U.K. — five minutes out of her Surrey, England, home.
Copley-Smith rents this 255-square-meter (2,700-square-foot) bit of land from the local parish and also manages it. Throughout the nation, land plots similar to this were set aside for local residents to garden and grow plants in. For Copley-Smith, it is a wonderful opportunity to expand her home’s garden beyond one planted completely with boxwood.
“As a professional designer, I believe it is important to work with the soil, grow plants from tiny seedlings and learn by mistakes — experiment,” she states. This mantra extends past the professional field, serving as a vital lesson to all gardeners, especially those with access to this much gardening area.
Laara Copley-Smith Garden & Landscape Design
“In large summer I have so far, and I really like harvest time. Often I will just pop to the vegetable garden to select vegetables for that day,” Copley-Smith states. Any leftovers are shared with neighbors; nothing is wasted.
She varies her crop annually, based on previous successes and failures and what she’d love to eat during the year. Squash, pumpkin, spinach, young kale, broccoli and cauliflower are among the crops here.
“One cannot dismiss the effect, strong presence and healing capacity that the gardening and garden may have in someone’s life,” Copley-Smith, revealed here, states. “Gardening in almost any capacity is worthy of your energy and time.”
Laara Copley-Smith Garden & Landscape Design
“Growing food plants, working with the weather, seasonal changes and studying patience are all components that will enlarge one’s professional skills,” she states.
Here netting protects pine from birds and cabbage white butterfly.
Laara Copley-Smith Garden & Landscape Design
The background of allotment parcels spans more than a century; a few references go as far back as the period of the Saxons, when cleared land sometimes would be jointly held.
The Small Holdings and Allotment Act of 1908 was the first modern laws seeing these plots. Subsequent acts passed during the century frequently collaborated with wartime and periods of economic turmoil — instances when demand for homegrown food was large. Today, waiting lists stage to allotments’ increasing popularity.
Revealed: Radicchio, zucchini blossom, bamboo leaf lettuce and plums out of Copley-Smith’s garden
Laara Copley-Smith Garden & Landscape Design
Tirza spinach thrives in the cool period.
Laara Copley-Smith Garden & Landscape Design
Gardeners adopt allotment gardening as an opportunity to grow their own produce, but there’s more than vegetables to be gleaned from the storyline. An annual bonfire is held to burn off all diseased plant issue. Local residents attend, many of whom have worked the storyline for decades. Life tales and decades of gardening knowledge bring neighbors of diverse ages, personalities and backgrounds together.
And while Copley-Smith notes that interacting can be a component of allotment gardening, you can choose your own experience, she highlights: “You can potter and do your own thing, or you can engage with other people in conversation.”
Laara Copley-Smith Garden & Landscape Design
Shallots grow in neat rows.
Laara Copley-Smith Garden & Landscape Design
Inspired by the design of traditional kitchen gardens, but with all the viability needed for handling such an extensive area, Copley-Smith designed a garden that’s beautiful both for its simplicity and productivity.
Bunk beds and pathways dominate her garden’s design. Oversize wood beds can be built up if she chooses to deepen the beds. Unpaved pathways allow for fast changes. The principal paths are 60 centimeters (2 feet) wide, and a number of the side paths are thinner.
Before Photo
Laara Copley-Smith Garden & Landscape Design
She constructed a drop in back for tools and supplies.
Laara Copley-Smith Garden & Landscape Design
Veronicastrum, sedum and Perovskia fill these summertime beds. Copley-Smith will include netting to protect the plants out of the fox cubs who love to jump in.
Laara Copley-Smith Garden & Landscape Design
Veronicastrum and aster seed heads emerge early in the season.
Laara Copley-Smith Garden & Landscape Design
One area is dedicated to pollinator-attracting perennials. Copley-Smith enjoys flowers and notes how they constantly complement the vegetable garden.
Here we visit Veronicastrum, panicum bud, sedum just peeking through foxgloves, white and purple phlox, and poppy lavender. She also grows Helenium, asters, lavender, hydrangeas, roses, Agastache, tulips, ornamental onions, Perovskia, poppies and anything else that will fit.
Laara Copley-Smith Garden & Landscape Design
Lavender, sweet peas, Perovskia and gaura in summertime.
Laara Copley-Smith Garden & Landscape Design
Rotating the plants and amending the soil with organic matter and leaf molds guarantee healthy plants. Interplanting edibles with companion plants can also be important. Copley-Smith even blatantly enables some edibles to blossom and self-seed. Here she grows Veronicastrum, aster and Perovskia.
Pollinator plants attract natural fauna, but sometimes staying hands off promotes wildlife many; Copley-Smith retains a pile of logs as a habitat and cuts back spent grasses and shrubs only after the threat of winter has passed, to provide shelter and food for wildlife over winter.
Laara Copley-Smith Garden & Landscape Design
Miscanthus, deschampsia along with panicum blossoms in late winter.
Look into what others in your area have done, Copley-Smith states. “Success includes experimentation, time, patience, exploring, reading and committing something.”
More information:
The National Allotment Society | American Community Gardening Association

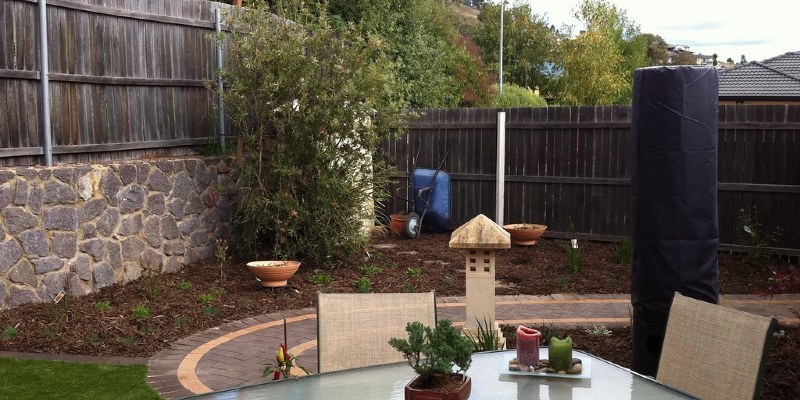
Get Wise to Size: How to Furnish an Outdoor Room, Little to Broad
August 30, 2019
Whether you’re looking to construct an outdoor dream area or dress up an existing terrace, plan ahead. A design with the ideal amount of square footage could make the difference between an elegant space and an awkward area. Do not worry if space preparation seems daunting at first — that is normal. However, with the right tools, it may actually be fun.
Below are some design and furniture ideas for outdoor spaces 6 by 6 feet to 16 feet square and much longer.
Busybee Design
Determine how you plan to use your own space.Do you plan to relax here or entertain? Is your distance going to be for a few individuals or groups?
While outdoor spaces are not rooms, the size demands are alike. Much like a dining area or a living room, you will need enough space for your furniture and to circulate. Measure the spaces in your home to determine if a similar layout will work for your outdoor deck, porch or patio.
Also be certain that your outdoor area is in scale to the remainder of your dwelling. A gigantic outdoor area next to a small house or a very tiny space next to a large home could certainly feel out of proportion and awkward. A fantastic guideline is to make your outdoor area like the rooms within your residence.
Troy Rhone Garden Design
An area around 6 by 6 ft is only right for a bistro table and a few seats — the ideal spot for coffee and the morning paper.
Archipelago Hawaii Luxury Home Designs
The identical size distance could also fit an oversized chair and side table it just depends upon your outdoor nook is intended for one person or longer.
Sutton Suzuki Architects
If you’d like a cozy living area with a couple love seats or oversize seats, an area that’s 8 ft would provide only enough distance. I typically like to tuck these types of outdoor nooks back in a corner, even if possible, to make them private.
Dave Adams Photography
Side yards make amazing outdoor spaces. Ordinarily, any side yard that’s 10 feet wide or wider has a great deal of potential. But keep in mind that side yards are commonly used for paths, so it’s crucial to keep at least 3 feet of width to get a walkway around your seating area.
See more thoughts for a side yard
Inc, C. Marie Designs
Dining spaces generally are contingent on the table dimensions. I suggest measuring the table you’d love to use and allow for 3 ft of circulation around the table. Should you use seat chairs on a couple of sides, then you can utilize a more compact area.
Inc, C. Marie Designs
In an area that is about 10 by 10 ft, built-in corner seats can quickly convert into a living room or a fire pit area. Multipurpose spaces operate well in small outdoor places — especially on rooftop patios.
Godden Sudik Architects Inc
Courtyards are great for just about any outdoor purpose. I really like them for city living. If your courtyard is surrounded by three walls, make certain it’s wide enough to allow light in. Do not go any smaller than 12 by 12 ft — and should you go bigger, it will only feel and look better. Use 1 wall to get a fireplace or barbecue and fill the room with some cozy furniture.
Amy Jesaitis
If you plan to use a very long dining table, allow for enough room to move around when you have a dinner party. Spaces around 12 by 14 ft tend to function nicely for a setup like this. Yet again, I suggest measuring your desk and allowing for no less than 3 feet around the table to get circulation.
Blue Ridge Landscaping
A circular space of 12 to 14 ft in diameter works nicely for fire pits. The circular shape allows for seats completely around the fire pit and contains an organic form. Circular outdoor spaces also mesh well with natural landscaping and can easily be juxtaposed with the rigid type of a house.
David De La Garza / ZURDODGS
A circular space around a fountain is another great idea to get a 12-foot-diameter outdoor living space.
J. Grant Design Studio
Outdoor living rooms may be used year-round when coated and paired with a fireplace. This distance, much like an indoor living space, is comfy at 16 by 16 ft and has enough room for multiple seating options and a little table.
Wheat’s Landscape
Consider creating an outdoor living room with a fountain as a focal point rather than a fireplace. The relaxing sounds of water will create a wonderful feeling for you and your visitors.

See the Amazing Orchids Unfolding at a New York Garden Show
August 27, 2019
There is a second from the 2002 Charlie Kaufman movie Adaptation, which is based on Susan Orlean’s book The Orchid Thief, when the toothless orchid hunter wades through chest-high swamp water in search of a rare varietal known as the Ghost Orchid. At first you think, “Oh come on. All this for a plant?” However, the more you understand about orchids — and the more you stare in their mesmerizing flowering faces — you start to comprehend the almost spiritual hold they have a tendency to have on people.
The lush, vibrant, sensually shaped kinds of orchids and their seemingly endless varieties — there are several 30,000 naturally occuring species, meaning this is the largest family of flowering plants — create them somewhat of a mythical flower. If you are in New York between now and April 22, 2013, you can see over 7,000 orchids during The Orchid Show at The New York Botanical Garden, the nation’s largest curated show featuring this plant.
The exhibition takes place from the garden’s Victorian-style glass house, which is the largest of its kind in the country, and includes orchids, aroids, ferns, bromeliads, epiphytic cacti and more.
Info: The Orchid Show, The New York Botanical Garden; March 2 to April 22, 2013; open Tuesday through Sunday, 10 a.m. to 6 p.m. (closed on some holidays); $10 to $25
Unique this season is that the incorporation of Hurricane Sandy–damaged trees, which will be utilized as design elements in the show and to support tree-dwelling plants.
The New York Botanical Garden
Whimsical detailing on this Reed Orchid brings to mind a cartoonish personality.
The New York Botanical Garden
The Reed Orchid has a special fusion of soft and harsh forms.
The New York Botanical Garden
The Slipper Orchid could have exaggerated teardrop-shaped petals. Hybrids of this flower have been created to make them easier to grow inside.
The New York Botanical Garden
This specific Slipper Orchid seems to be enticing a praying mantis.
The New York Botanical Garden
A head-turning fractal layout identifies the Butterfly Orchid.
The New York Botanical Garden
Darwin’s Star Orchid is a pointy combination with a creamy, tasteful color.
The New York Botanical Garden
The Cane Orchid drips and droops using a soft purple shade.
The New York Botanical Garden
This Cane Orchid oozes with lavender.
The New York Botanical Garden
The delicacy of this Renanthera is balanced by the strength of its fiery reddish color.
The New York Botanical Garden
Pattern and color on this American Moth Orchid create a stunning design.
The New York Botanical Garden
How to Begin Your Own Orchid Screen at Home
You can purchase an Assortment of orchids in almost any city. The most frequent type is that the Moth Orchid (revealed), which, based on garden designer and writer Jenny Peterson, is among the simplest to maintain and keep inside. Frequently available at supermarkets or Home Depot, Moth Orchids aren’t as finicky as the exotic kinds, which are available only at technical orchid growers and nurseries and have a tendency to require exacting requirements and humidity management. However, the payoff — crazy-looking petal patterns and color combinations — is worth it.
The New York Botanical Garden
Peterson’s Moth Orchid care tips:
Moth Orchids normally arrive already potted in a special soil mix which has a high peat content. Or you could grow them on a piece of tree bark.Always place the plant in direct sunlight. A south- or east-facing window is best.Maintain a moderate temperature, between 75 and 85 degrees Fahrenheit. Even in a distance cooled by an air conditioner, an abysmal near a semisunny window will be only fine.Don’t overwater! A frequent suggestion is to water after every seven to 10 days, but Peterson recommends watering just twice per month. She gives her orchids about half a cup of water to the first and 15th of every month. For bark-grown variations, mist the bark or submerge the bark piece from water once a week.Fertilize once a month using a special mix made only for orchids. Give bark-grown orchids a fertilizer that is high in nitrogen content.Don’t give up. Peterson says it is ideal to keep consistent conditions and care, as orchids flourish with a normal routine. Their glowing blooms can last for months, and if you continue to water and simmer yours even after a bloom dies away, it ought to rebloom in a few months. Can you grow orchids? We would love to see them!