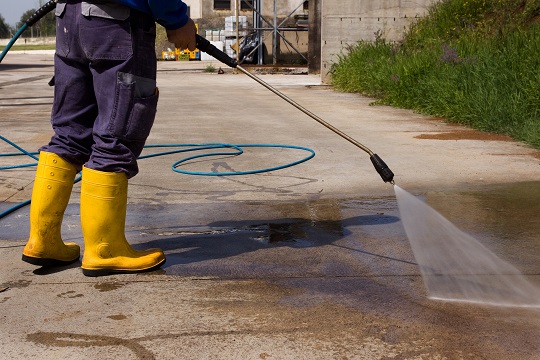
How to Pressure Wash Your Driveway
April 16, 2018
When it comes to maid service Pasadena the driveway, many homeowners immediately think of hiring a professional. But you can actually remove the wear and tear from your driveway with just a few simple steps. Doing so will save you money that you would have spent on hiring a professional washer.
Here’s how to use a pressure washer to clean your driveway:
Sweep the Surface
First, clear any dirt and debris from the driveway using a broom. Next, cover the nearby walls and doors with plastic sheeting and a tape. This is to protect your home exterior from any loose debris as a result of the cleaning services Pasadena.
Read the Safety Manual
Carefully read and understand the steps on how to use your pressure washer, especially the safety precautions. Each and every pressure washer is different and some may require special preparation.
Degrease the Driveway Surface
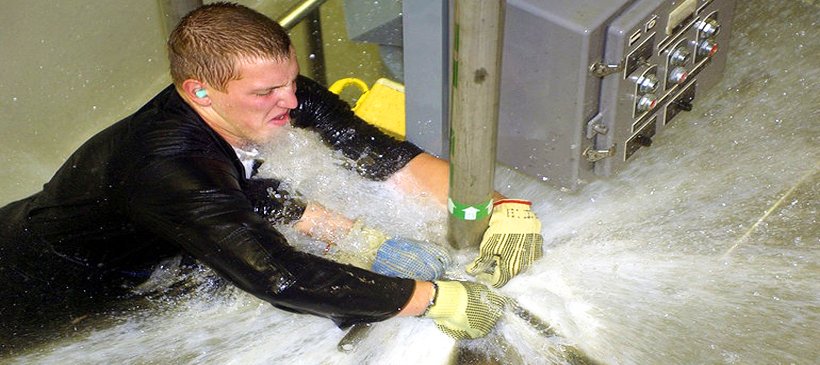
To ensure excellent results, spray the concrete surface of your driveway with a spray degreaser. Keep a distance of about six inches away from the surface and scrub the degreaser into the concrete with the use of a stiff brush. You can also use the attachment tool of the pressure washer for this.
Attach a Spray Wand Tip for the Detergent
Next, choose the tip that’s designed for washing. This is often labeled on the pressure washer as soap. Snap it into the spray wand tip.
Attach the Hoses
Attach the hose to the pressure washer. The hose is provided when you buy the device. Next, connect a 50-foot garden hose into the water supply of the pressure washer and turn the device on.
Prepare the Pressure Washer for Detergent
The pressure washer will already come with a detergent siphon tube that you can attach to a detergent container. The moment you turn the pressure washer on, the siphon tube will immediately bring the detergent towards the water stream of the machine’s spray wand.
Spray Detergent
Wear a pair of safety gloves in order to keep your hands protected. Once you have the gloves on, you can start applying the detergent by holding the spray handle down while making sure that you keep a consistent distance of 8 to 18 inches away from the driveway.
Start by working your way back and forth on the surface while maintaining a smooth and controlled manner. Overlap each stroke with six to eight inches in each stroke and when you’re done, leave the sprayed detergent on the surface for about five minutes.
Pressure Wash Concrete
Next, change your tip to the one that’s labeled “25 degrees.” You can now start to pressure-wash the driveway by holding the spray handle down and working your way from one side to another.
Seal Concrete
Now that you’re done with Pasadena cleaning service, it’s time to seal the driveway. Start by pouring a waterproof sealer to the paint pan. Add a roller cover to the roller and attach the extender pole. Beginning in the middle, apply the waterproof sealer using the roller. Leave the surface to dry for at least 24 hours before you start using the driveway.
The best way to Attach Wood Window Screens
April 14, 2018
Window screens are an energy-helpful approach to improve ventilation in a space while maintaining debris out doors and bugs. On older houses, wood-frame window screens enhance the windows in an in a manner that that steel screens canât. Although wood-frame window screens are removable, they’re not appropriate for each window, aluminum and particularly vinyl. The clips that maintain screens in location need drilling, which may void your window guarantee. Screens are typically attached to the the outside of the home, and that means you may need a ladder.
Set the display set up from the window to decide which type of change clips you need to install the screens. Some clips are flush-mount, meaning they’re flat over the backside. Others have a screw-opening shank, which enables the arm to to match on the fringe of of a display that is thicker and raises the free-arm of the clip. In the event the encounter of the body matches flush with all the aircraft of the window jambs, use flush-mount clips. Jambs will be the right and left portions of the window that butt from the sides of the window sashes. In the event the display sits greater or more out than the aircraft of the window jamb or is thicker, use flip clips using a screw that is longer – .
Measure in the very best of the window down the right or left jamb to roughly one quarter of the peak of the window. Mark the jamb at that place using a pencil. Measure the jamb in the bottom up and make another mark. Make a mark centered over the peak of the jamb in the event the window is extremely tall. Repeat to mark the jamb on the other side of the window. These marks signify the approximate places where the display- change clips that are mounting ought to be installed.
Place the window display contrary to the window and center it. Mark the correct and left edges of the display a-T peak of every pencil mark which you made for the flip clips. These marks assist stop you from installing the clips also near the screen.
Remove the display and established it a-side.
Place the straight back aspect of one window display flip clip contrary to the jamb a-T one of the pencil marks which you made along the sides of the window screen. The screw opening on the clip needs to be roughly 1/16 inch straightout from the pencil mark. Create a mark and onto the jamb using a pencil, when it is too small to get a pencil to to match through, or t-Race across the not in the screw hole opening. Repeat to mark the area for each turn clipon the correct and left sides of the window.
Select a drill-bit that’s slightly smaller as opposed to diameter of the flip-clip mounting screws and fasten the bit to your power drill.
Drill a pilot hole to the jamb at the place of every clip, drilling to some depth slightly significantly less compared to period of the screws. Donât drill totally through the jamb.
Place a clip of the pilot holes against one, insert a screw and tighten the screw using a Phillips-head screw-driver or use a Phillips-head screw-driver bit on the strength drill. Repeat to install all the clips.
Twist the clips to to show the arms that are free straight down or up.
Set the window display set up from the window.
Twist the clips to to show the arms that are free over the fringe of of the display, keeping the screen contrary to the window.
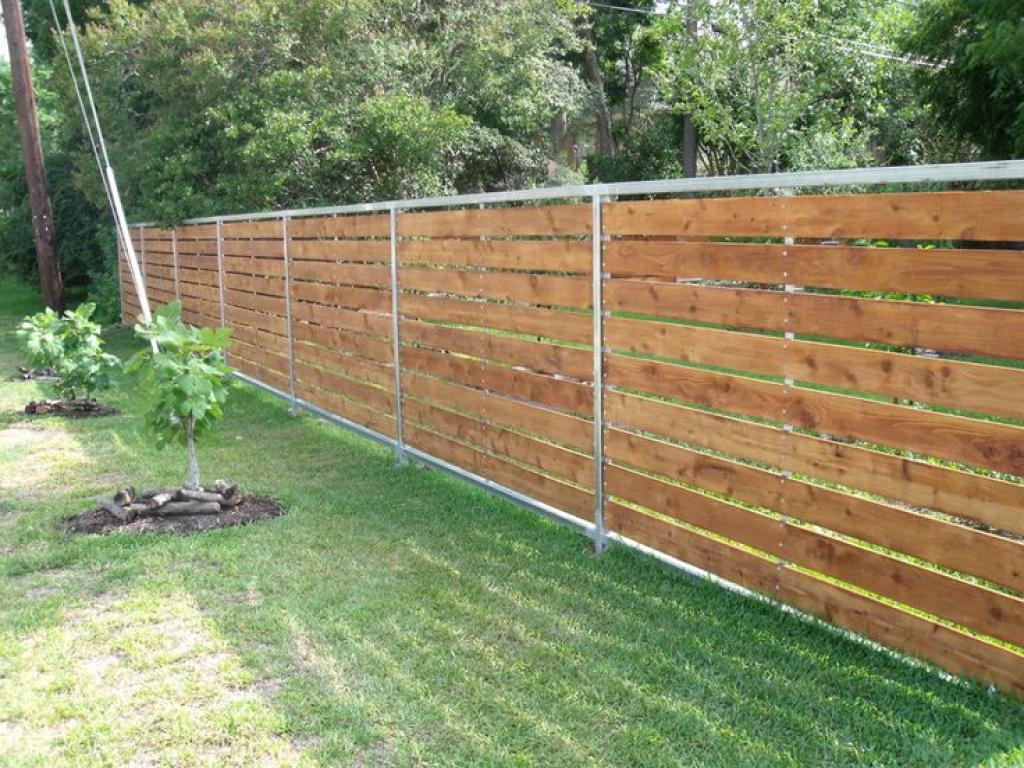
How to Replace Wood Fence Panels in 5 Steps
April 12, 2018
Depending on the number of fences Tuscaloosa you need to replace, you will not have to spend more than a few hours on the job, especially if you are doing it alone. If you get some help, you will finish the project even faster.
For this project, you will need the following tools:
-Tape measure
-1 ½ inch outdoor screws
-Skill saw
-Hammer
-Screwdriver
-Wonder bar
Replacement wood panels
If your fences Tuscaloosa panel is damaged, it looks bad. If you have kids playing around the compound, a damaged panel will be an accident waiting to happen.
This is why it is important to have the fence panels repaired as soon as possible by following the 5 steps below:
Remove Damaged Panels
You must remove the damaged panels first. Unscrew them out of position. In case yours are nailed into position, get a wonder bar and pry out the nails. To expose the gap between the beam and the panel, hammer the hind side of the panels, and then fix the wonder bar and force the damaged panel out.
Measure the Replacement Piece
You need accurate measurements for the wooden panels. With the tape measure, ensure the replacement piece is the same size as the ones being replaced. If you need to, trim the panels to size with the skill saw. The good thing is that most of these panels are usually available with their corners trimmed at 45 degrees.
Position the Replacement Panels
Measure the distance between the fence panels before you start mounting them. Prepare two pieces of wood measuring the same distance as between the panels. These will act as your guides. Hold the replacement panel against the beam and then put the guides on both sides, so that you can get the right position of the panels you will install. Mark this position on either side of the fence with a pencil.
Drill Pilot Holes
Hold the panel to the beams using nails with two screws. Make sure you have four fastening joints. With the panel vertically held against the beam, hold a small wood length on top of the panels. At the same time, factor in the horizontal position of the pencil marks that you made earlier. While in position, drill four pilot holes with your drill bit and screwdriver. Ensure you also drill into the beams.
Mount the Panel
Now that the pilot holes that will be used for the Tuscaloosa fences panels are drilled and you have already figured out the horizontal and vertical position, preset all the nails or screws into the panel. Then insert the panels in their final position. The tip of the nails and screws should also fit into the holes you made on the beams.
Starting with the top nails or screws, fix them halfway into position, and repeat the same for the ones at the bottom. Check if you have set them properly.
This is all you need to do to replace your wood fence panels. You can follow these steps for all panels that need replacement. In case your old fence panels were painted or stained, do the same thing to the new panels before you install them.

Soil Type-S for Green Beans
April 10, 2018
Green beans (Phaseolus vulgaris) are developed in backyard gardens around the country, plus they can be equally suitable to developing in Sunset’s Environment Zones 1 through 24. A warm weather crop beans ought to be planted in full sun after all danger of frost has passed. If you’re able to provide all of them with the greatest soil like the majority of garden vegetables, green beans create the crop.
Soil Types and Textures
Even though they are able to grow in nearly any soil type except large clay, Sandy and silty loam soils are best for beans. Soil with a great deal of clay tends to be badly drained, which may cause blossom fall and root rot. For those who have clay soil, it is possible to improve its texture by integrating amendments and tilling it carefully. The soil should preferably be stored moist, but prevent damp, water-logged places.
Acidity and Alkalinity
The acidity or alkalinity of soil is measured by its own pH. Neutral soil has a pH around 6.5, while something greater is alkaline and something lower is acidic. Green beans grow best in neutral or near-neutral soil, although they are able to tolerate a pH between 5.5 and 7.5. If required, it is possible to raise the pH of your backyard soil by integrating one of one of the other liming items or ground limestone. It’s possible for you to lower the pH by adding a fertilizer or sulfur containing ammonium sulfate.
Fertility
Green beans grow well in soil that is fertile, plus less nutrients are used by them than several other garden veggies. Incorporating a generous quantity of other organic matter or compost to the soil before you plant beans typically provide them with nourishment that is enough, although in a few environments they are able to also advantage from an allpurpose fertilizer containing nitro Gen. Avoid over-using nitro Gen fertilizers, nevertheless, since this may lead to vigorous plants that produce less beans.
Soil Screening
It really is smart to have your s Oil examined before you plant beans. Kits are accessible through most garden-supply retailers in addition to your closest college extension off ice. The outcomes of the s Oil check will expose the nutrient and pH content of your s Oil, which which can make it more easy to choose if soil amendments are essential and in what quantities.
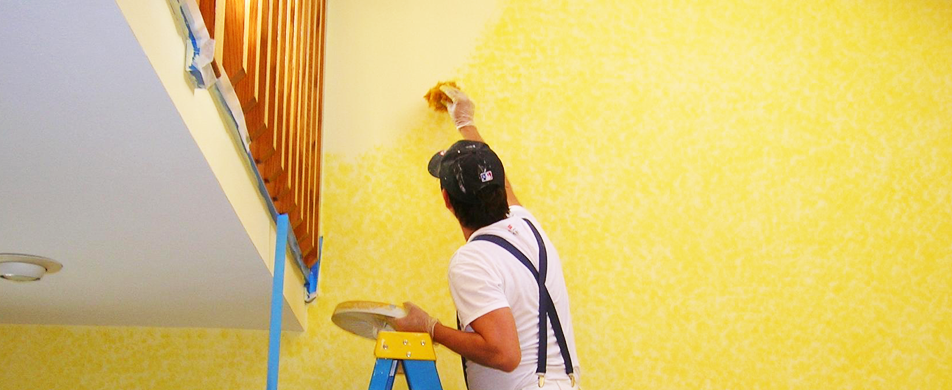
Tips on How to Hire a Painter
April 9, 2018
As a homeowner, at some point, you will need to hire painting contractor Glendale, AZ for some project. One thing that everyone looks forward to is quality results when the painters are through with their work.
The following are some useful tips that should help you find the right contractor for the job:
Meet the Professional
Before you award someone the contract, make sure you meet no less than 3 different experts. You can also seek references from family members or friends. Make sure you hold the first meeting with them in your home so that you can tell whether they can do the job. In most cases, experts take a longer time assessing the house before they can give you an estimate so that they leave nothing to chance. At the same time, find out the size of their team, and how experienced they are.
State Your Expectations
Quality painting does not just end with the number of coats applied. You must discuss with your painter what you want. Talk about the cost of the project. Talk about what you expect when they are through. If possible, provide them samples of what you are looking for, and then agree on feasible recommendations before they begin.
Get Estimates
For each contractor who comes to inspect your home, make sure you get a written estimate for the work. The estimate must also include information on the cost of labor, cost of materials etc. It should be elaborate, complete with the materials’ model and brand that the painters will be using.
Check References
It’s advisable that you hire a painter who has been working on similar projects for years. They must present their references and show you some of the work that they have been done in the past. From the references you receive, follow up and find out from the previous clients whether the painter is as good as they say they are. Also, try to find out any challenges that the client had when working with the painter.
Consider Credentials
Before hiring Glendale painting, always make sure that you look through their credentials. Ensure they are members or affiliated with some trade group, some association or local organization with a strict code of ethics in the region. You should also look at their license and make sure they are valid. There’s nothing bad about doing a background check based on the same information.
Obtain a Contract
You need a contract that’s complete. The contract must have all the necessary details about the contractor, from their name to the address of their business, their license number and anything else that was included in the estimate you agreed upon. If there are any caveats, these should also be expressly indicated in the contract.
Ask for Insurance
Make sure you receive a copy of the liability and relevant insurance certificates from the painter. In case they do not have any of these, walk away. This is because you might end up being liable for any damages or misfortunes that may occur in your home.
Ask for a Guarantee
You need a guarantee from the painter that the work will be done to your specifications, if not better. Therefore, as part of the contract, the Glendale painters should give you a guarantee against peeling, chipping, blistering and clearly outline procedures for reprieve in the event that any of these occur.
Choose the Paint Yourself
Make sure you choose the paint that you want. Do not allow the painter to persuade you into choosing the paint that they prefer unless you are comfortable with their option.
Hold Out the Payment
Unless otherwise stated, never make a huge deposit on the payment. It’s advisable to commit to the contract with around 15% of the payment, and then when you are satisfied with the work, you can make the rest of the payment.
How to Find an Emergency Plumbing Service
April 8, 2018
It’s not until you find yourself in an emergency that you think about plumbers in Phoenix AZ. Sadly, the panic that sets in when an emergency situation is imminent makes many people lose a lot of time, and increase the damage. There are some things that you need to know about before you hire a plumber so you can find the right one without having to pay a lot for their services.
Response Time
In the event of an emergency, a plumber should come to your home urgently. Most professional emergency plumbers operate on a 24-hour basis. However, their efficiency in such a situation will also depend on how far they are from you. In case the plumber you need is far from your residence, he will usually recommend someone else who can do the job and is readily available.
Licensing
You must make sure that the plumber you are hiring has the licenses to work within your state or city. In some areas, they do not need a license, but where it’s necessary, make sure they do. A licensed plumber has passed a certain exam before their certification. They are, therefore, qualified and experienced.
Remember that a plumbing license and a business license are two different things. A business license allows the professional to run their business, while a plumbing license shows that they are qualified to work as plumbers.
Fees
You also need to find out how much the plumber charges per hour. In case they can give you an estimate on call, it would be good. Take note that most plumbers, however, insist on inspecting the premise before they can give you a realistic quote. However, professional Phoenix plumbing should be able to provide a rough estimate even before they come to your house.
There are also emergency plumbers who charge additional costs like service fees. Keep in mind that this is a fixed charge, and as long as they are on contract to come to your home, it will be applied whether your problem is fixed or not.
Insurance Cover
There are two insurance covers that the plumber must always have; the liability insurance cover and the workman’s compensation cover. Liability insurance protects you from any damages that occur as a result of plumber’s actions. This covers repairs and any damages incurred in the course of plumbing. Without this, you will have to pay for any of these mishaps out of your own pocket. Workman’s compensation covers the plumber and any of the team members in case they are injured while handling your plumbing problem. If the plumber does not have this insurance, you will have to pay for their hefty medical bills and any other costs that arise from injuries sustained in the course of emergency plumbing in your home.
Most plumbers who don’t have insurance will be more affordable for you when you need plumber Phoenix AZ. This is because they do not have insurance premiums to pay. However, what you save from working with them is very little compared to what you may have to spend in the unlikely event of damages or injury.

The best way to Care for Basil Crops Outdoors
April 7, 2018
Basil (Ocimum basilicum) creates prolific foliage outside throughout the warm summer months. The leaves enhance both cooked and uncooked dishes, pairing particularly well with tomatoes. The leaves flavor best when harvested before the plant flowers. Frequent choosing stops therefore the crops generate longer flowering or it is possible to plant seedlings that are clean every six months for an ongoing offer. Plant basil when night-time temperatures are steadily typically in mid- to late-spring for the Climate of Sunset Zones 14 and tend it throughout the growing period to make sure the crops that are most effective.
Where it receives at least six hours of sunlight everyday plant basil. A well- drained mattress, such as one near a south-facing wall can gain in the warmth that is reflected.
A 2 inch layer of straw mulch or natural bark on the bed when the crops are around 6″ tall. Avoid within the the stems using the mulch and abandon a space between the layer as well as the stem.
Water the basil once-weekly, supplying about 1-inch of water. Basil might not need extra irrigation in the event the soil feels moist into a 6-inch depth.
Trim back the growing tips of the basil or pinch stems once each stem has at least four sets of leaves but before six sets are produced by it. Make each cut about half-way down the size that is stems above a leaf. Use the leaves in the pruned ideas as a culinary herb. Weekly or -weekly — pruning of crops results in fuller -generating basil.
If it begins to create flower buds cut back the whole plant. Trim it back to the cheapest two leaf sets together with the shears, utilizing the trimmings that are ensuing .
A well-balanced fertilizer after trimming or harvesting the plant again to the floor. Use the fertilizer in the bundle- price that is suggested. By way of example, 1 tablespoon of 101010 soluble feed is typically diluted a, then gallon of water before program the basil is watered with the the answer.

The best way to Clean a Grill Cloth
April 5, 2018
Speaker grill cloths guard circuits and the the inner parts of a speaker from particles and dirt. As time passes, your speakers can pick up oil, grime as well as mold. By utilizing dry cleaning methods to clear your grill fabric, it is possible to make sure the cloth can not fray or shrink and stays in tact.
Unplug your speakers. Remove the speaker if feasible. Some speaker grills are installed on frames that slide off in the speaker housing or easily pop-off. The ones that don’t have grills installed on frames which can be held in place. Remove the screws in case your speaker has screws on the bottom close to the grill body. Insert flat-head screwdrivers on the underside of the speaker under the the grill body to the slots close to the toes or screw-holes and carefully pry the frame off and up the speaker. There’s a rubber gasket immediately beneath the the grill body, when you eliminate the body to not harm it, therefore take care. You might need to to perform the screw drivers across the body display that is seam and pry it up to take it off.
Vacuum the grill to remove dirt. Blow out any dirt in the interior of the speakers with air that is compressed.
Put on a breathing apparatus. An even layer of dry cleaning spray that includes liquefied petroleum fuel on the grill fabric. Wait for the spray to totally dry and change right into a powder. The powder absorbs grime and any oils the spray lifted up from the grill fabric.
Gently operate the built in brush on the dry cleaning spray cap within the powder to dust off it. Vacuum up any powder using an upholstery attachment.
Replace the grill and screws (if any). Drive the grill body on to the speaker, when there is a rubber or plastic gasket and prevent shifting or twisting it as you do s O to make sure that the gasket stays in location throughout installation. The gasket minimizes vibration triggered by sound when the speaker is in use.
13 Beautiful Porch Ideas To Get Inspiration From
April 3, 2018
handyman services adds a lot of value to your house. There are a number of ideas that you can work with, all of which will make your porch an enjoyable place to be.
Here are some good ideas that you can consider:
Leisurely Porch
This one is all about the looks. You can use railings here. However, before you consider building it, you should look at the local building codes and then start on your project to get amazing views.
Breezy Porch
A breezy porch can double up as a functional and decorative structure. To complete the look, have unique ceiling fans installed. For the floor, leave it airy and open, making it easier for the fan to circulate the evening breeze.
Rustic Porch
To get the perfect rustic outlook, install a cozy fireplace and complete it with rich wood textures. When you are through, you should have a mountain escape designed in your porch.
Tropical Porch
Columns and posts will play a pivotal role here. They support the roof of house repairs and at the same time, they will provide an element of beauty for your porch.
Entertaining Porch
For the ideal entertaining design, make sure the porch aptly links your exterior and exterior. You will also be adding some quality living area here. Make sure you have room for dining and enough space to lounge.
Screened Porch
A screened handyman is ideal for the back of the house. You can have it designed with impressive views of the ocean or whichever natural feature you have in your neighborhood. You will also have the screen from where you can keep an eye on the kids when they are playing.
The good thing with a screened porch is that you can enjoy a lot of activities. Depending on how you want it designed, you can save a lot of money in the process.
Eclectic Porch
This calls for some expert design. You will need to blend accessories and furniture. Go wild with your design, lavish the porch harmoniously, and make sure the materials and furniture you use are mildew resistant.
Seaside Porch
This is all about natural light. You can use large window panes and possibly French doors here. It’s ideal in case you want a place where you can relax as soon as you come back home.
Classic Porch
A classic porch can be installed in front of your house. It’s a perfect welcome area for guests.
Cottage Porch
You must be ready and willing to work with a lot of green as the main color here. For a cohesive appeal, make sure you use the same hue all through.
Laguna Porch
The floor plan here is designed with comfort in mind. It should have an inviting appeal, and you will also want to use weather resistant fabric here.
Southern Porch
The main theme with the southern handyman contractors is to ensure you have rocking chairs, wooden to be precise, for that antebellum experience. You can also add a nice porch swing.
Trendy Porch
Here you need to control the amount of sunlight that seeps into the porch. You will play around with drapery depending on your preferences so you can make a stylish finish.
The best way to Trim a Siberian Elm
April 3, 2018
Siberian elm (Ulmus pumila) are big trees mainly developed for shade. These fast growing trees create branches that can break off when subjected to powerful winds and heavy rains. Proper pruning methods keep the tree decreases the quantity of broken caused by limbs, aesthetically-pleasing and healthy. Even though eliminating diseased or broken branches should occur as quickly as they have been noticed pruning is best completed through fall. Siberian elms are hardy in Sunset’s Environment Zones 1A through 11 and 14 through 21.
Put on protective glasses and work gloves to prevent damage to eyes or your hands while pruning. Sharpen the blades of a pair of loppers, pruning shears and also a saw to make sure smooth, effortless cuts. Fill a container with 1 part denatured alcohol and 9 parts water to sterilize the the equipment after each cut.
Branches less than 1-inch in diameter with loppers or pruning shears. Make the cut 1/4 inch above the off-shoot if lateral closest or you’re only eliminating a part of the branch. Slice the branch in a 45-degree angle. Cut one to two inches outward from your branch’s collar–the stage where it connects using the trunk–when eliminating an entire branch. Never cut a branch flush with all the trunk.
Branches with a diameter of 1-inch or greater using a hand-saw. Use the three-cut approach the branch to be prevented by these branches from stripping and breaking the bark of the tree. Make the cut on the lower of the branch, one to two feet in the pruning point that is required. Cut through one third to one half of the diameter of the branch. Position the 2nd cut 3″ on the very best side of the branch above the cut. Expect the branch as it is being made by you to to interrupt between the first-cut as well as the cut. Make the cut in the specified pruning level a-T a 4 5-diploma angle.
Prune any dis-eased or damaged branches in the Siberian elm. After each cut to sterilize and avoid the spread of dis-ease to healthful branches dip the device blades to the alcohol answer. Remove any branches infested with insects that are harmful. Burn infested or dis-eased branches.
Cut out any branches which can be crossing or rubbing against still another branch. Remove branches with slim crotches, or developing in an angle that is shut to the trunk, to stop them from breaking and splitting aside the trunk as they mature.
Remove branches on the bottom 6 to 8-feet of the trunk in the event the tree is developing alone in a lawn or garden location. Cut off all branches to the lower 8 to 10-feet in the event the tree is near or overlaps a side walk, driveway or backyard route. Remove in the event the Siberian elm is portion of a windscreen or hedge planting, the cheapest branches which can be resting on the floor.
Prune every-other branch in the middle of the elm out to open up the tree and permit air and mild to achieve the interior trunk. Remove onethird of the branches of the tree in a time to a void overstressing the tree.