
From Perching on Light Fixtures the best way to Stop Birds
February 23, 2018
Outdoor light fixtures provide illumination walking from trespassing in your property and deter criminals or committing acts of burglary. However, birds who enjoy perching on the fixtures are also attracted by your light fixtures. These guests often abandon messes that are ugly and unwanted near the fixtures. Keeping birds off your outside light fixtures needs a long time of checks and of energy to make sure the birds avoid.
Place a tough item on the very top of your fixture where the birds typically sit. The tough item could be broken pottery chicken-wire or an block of wood-cut in a zig-zag pattern. Mount the item that is tough to the fixture using a leather strap, wall-mounting putty or string.
Mount chicken spikes onto the fixture. Spikes get in the chicken way of sitting on or sitting on the fixture. Select chicken spikes that match the colour of the light fixture. Tie, glue or screw the spikes in to location.
Mount a owl near-by to deter birds out of your fixture. Owls are birds that eat birds. When they are able to see what seems to be an owl while they have been perching on the fixture, the fixture will be avoided by your birds.
Hang a set of windchimes in the underside of the fixture. The regular clanging of the chimes could be sufficient to annoy the birds from sitting in your fixture, and deter them.
Play recordings of animals and birds including owls, falcons or coyotes or appears like fireworks on a sound device. You might need to use the sound device for a number of days before your fixtures are associated by the birds using the frightening noises.
Allow a cat to relaxation as feasible as in your porch or to sit in the window close to the light fixture. The sight of a cat might be sufficient to repel the birds.

The best way to Replace the Filter in a Water Softener
February 20, 2018
Homeowners that have water, or water with mineral content that is large, can choose to get a water-softening system. The municipal water-supply of the complete home’s runs throughout the softening elements to eliminate calcium and magnesium, which are the primary culprits in decay from residue buildup. From infiltrating the program the filter residing in the beginning of the levels stops sediment, including particles. These particles can accumulate over time and damage the whole method that is softening. Every 3 months, changing the filter will help keep the performance of the program.
Turn off the primary water-supply to the filter. Turn the valve which is downstream in the filter off. These two primary shut-offs will isolate the filter in the device.
Slide a bucket below the filter’s primary housing to catch any water spills that are accidental.
Press the button situated on the housing of the filter. Each producer should have a button on the housing; so it is visible, the button can be a vivid colour, like red. You might see some water leak out. This button-press will repressurize the water-softening system so the lines can nevertheless supply water to the taps through the filter procedure that is transforming.
Hand change the housing in a clockwise movement of the filter while looking down onto the system. While shifting the housing to the aspect, use caution; it’ll be full of water in the machine.
Pour the water in the housing to the bucket. Visually identify the filter in the housing. Pull out the filter as well as set it apart.
Place a filter to the housing manually pressing it to the inside of the housing. Visually confirm that the gasket, or O-ring of the housing, is nevertheless pressed into its groove.
Hand change the housing and filter configuration by searching down onto the device to the water-softening method utilizing a counter-clockwise motion. Tighten before the housing is connected to the primary softening assembly.
Turn the valve that is down-stream straight back on. Turn on the water-supply. Run water through the taps to test for capabilities that are regular. In the event the filter is precisely seated in the housing the water needs to be clear.

The best way to Paint Linen Closet Shelves
February 14, 2018
As you prepare your house for sale, donât forget the the linen closetâs possible as a hidden gem. A clear, well-structured linen closet isnât the first thing potential customers see, but itâs an essential depth which is noticed. Painting the shelves is an easy task that provides immediate freshness to your linen closet. In case you choose to use a color paint on the shelves, it is possible to add some colour by topping the shelves subsequent to the paint dries using an attractive shelf paper.
Remove the shelves if feasible. Remove the brackets when they’re held in place with brackets and store them in a little container to avoid their reduction. Leave the primary tracks that help the shelves.
Place a paint tarp beneath work location to prevent paint splatters on carpet or the ground. Lay the shelves, if detachable, on the tarp.
Fill a bucket with water and a few general-purpose cleanser. Dip a rag to the water and wipe the shelves clear. Clear them in the event the linen closet shelves aren’t stationary. Allow the shelves to dry completely.
Mask surfaces adjacent to stationary linen closet shelves with blue painterâs tape.
Open a can of latex enamel paint and stir the paint carefully using a paint stick. Pour some paint.
In the event that you need to paint shelves in the closet apply paint to the edges of closet shelves first. Use a paintbrush to cut in about 2 or 3″ next to the tape that is blue.
Paint the shelves with both a roller or a brush. Function in the very best shelf down, in the event that you need to paint shelves in the linen closet. For shelves that are detachable, prop the shelves against a wall or alternative support so you could paint one side as well as the edges of the shelf.
Follow the paint can guidelines to find out if essential when it is possible to apply an additional coat.
Around when the paint on one aspect dries flip shelves paint the other aspect of the shelves.
Replace shelves in the linen closet when the paint on the side that is next dries.
Information on Crabgrass
February 10, 2018
Crabgrass (Digitaria species) is an invasive weed which has become common through the United States since its importation from Eurasia. It requires on the landscape, leaving patches of ugly development where a garden stood and invades lawns. Crabgrass thrives in almost all all of the Environment Zones of Sunset and is regarded extremely hardy.
Characteristics
Both easy and huge variations of crabgrass are recognizable by their low-profile and jointed look and are frequent throughout California. Crabgrass can not re-treat if mowed very quick and grows into a height of 6″. Quick mowing will is resilient and damages crabgrass. If permitted to develop unfettered it reaches heights of up to 24-inches. They’re annual crops, creating seed dwelling for 12 months and dying. Their offspring dominate the like and the subsequent year.
Elimination in Lawns
Before seeds are laid crabgrass may be ruined most effortlessly throughout its first year of existence as well as the likelihood of its own return is at the very least. Crabgrass which has has received an opportunity to to put seed can lie dormant for a number of seasons, then make a come back that is sudden without warning. Mow the lawn reduced where crabgrass has sprouted and hose your mower down soon after after to remove the possibility of spreading seeds else where. Irrigate your garden really nicely so the water sits below the area, out-of-reach of shallow rooted crabgrass. Don’t water often so the crabgrass dehydrates and dies in the interim. Your lawn-grass WOn’t be impacted as the water-supply can be reached by it below. A corn gluten or trifluralin anti-weed remedy before crabgrass seems as a preventive measure.
Eliminate in Gardens
If crabgrass seems in your backyard, pull it byhand instantly to avoid the spread of seed. Where you seen the crabgrass of water if feasible, starve the location. This mixed with immediate sunlight stop development and can eliminate potential eruptions. Apply a post-emergent weed-killer to backyard locations which do not include herb, veggies or good fresh fruit -creating crops. Apply a wood-chip mulch are as over where crabgrass eliminated and continues to be sighted. This decrease the need for herbicides and can block its potential development.
Fending off Crabgrass
A tightly and healthful garden that is developed will choke crabgrass off, stopping spread and its development. Between 2 and 4 pounds of large-nitro Gen fertilizer to every thousand-squarefoot region of your garden each autumn to aid also make it mo Re dense and reinforce your garden. Use the fertilizer in two waves, one in drop as well as the other prior to cold temperatures begins after the last mow. Certain type-S of grasslike fescue and Bermuda are s O robust and develop s O vigorously that they don’t enable a possibility to sprout in the first spot to crabgrass.

The Best Way To Reproduce Orange Trees
February 6, 2018
Oranges will be the most widely grown fruit on earth. In the U.S., Florida is the biggest producer, followed by by California. Hybrid types and all seedless have to be re-produced by bud grafting. Bud grafting is is recommended since it creates daughter trees similar to the parent as well as the tree requires half as long to mature, although some types may be grown from seed. Any kind of tree that is citrus will graft onto any kind of citrus.
Bud Grafting
Select a robust, wholesome tree as the root-stock to obtain the bud graft. Perform bud when the bark on the root-stock tree can be peeled from the wood grafting in spring. Select powerful, wholesome budsticks from the scion tree which is grafted onto the root stock tree. Cut budsticks from the ideas of tree branches that are scion ahead of the trees come out of dormancy. The budsticks have numerous buds and should be less than 12 months old, less than 1 / 4 inch in diameter. Allow the leaf stems, although trim off the leaves stick to the budsticks. Wrap the budsticks in damp paper towels, place in a zip-type plastic bag and store in the fridge. They’ll keep for as much as four weeks.
Select branch or a stem on the root-stock tree which is between three-quarters and a-half inch inch in diameter to obtain the bud graft. Create a horizontal cut about a third of the way round the stem or branch, heading to the wood going right through the bark. Create a cut in the middle of the horizontal cut about 3 times the amount of the cut. Peel back the bark on both sides of the cut that is vertical to create a pocket that can receive the bud graft.
Select a plump bud in the budstick. Form in the bottom of leaf stems. Create a horizontal cut about threefourths of an inch above the bud. Cut in the budstick planning behind the bud/leaf therefore the bud, leaf stem as well as a small little bit of bark and wood individual from the budstick stem. Donât touch the flat facet of the separated bud. Handle it.
Slip the scion treeâs bud to the bark pocket on the root stock treeâs stem or branch and fold the peeled bark straight back within the bud. Be certain the bud is oriented toward the branch or stem suggestion, the sam-e way it had been oriented on the bud stick. To ensure no location of the graft is uncovered wrap tape throughout the bud graft. This assures that scion and the rootstock keep in continuous con-Tact and the graft will will always be moist. Remove the tape after two as well as a half weeks. In case the scion bud is green, it ought to sprout right into a tree or branch and is alive.
Grow From Seeds
Select a orange and eliminate the seeds. Wash the seeds and soak them in water that is clear. Orange trees may be began from seed in doors a-T any period of the yr but the trees will be given the sunlight by planting season.
Fill earthenware flowerpot or a sizable plastic with planting medium that is moist. Plant two or three seeds in regards to a half-inch-deep in the planting medium.
Cover the pot having a transparent plastic bag and spot in a sunny window. The seeds should sprout in about three months. Remove the plastic when the seeds sprout. Keep the s Oil moist but maybe not soaking-wet.

The best way to Plant with Manure
February 3, 2018
Pinch backyard and your nose with one of nature’s best: manure. In the event that you buy composted, illness- manure from a nursery planting with it’s different from using other amendments. But in the event that you’ve got fresh manure in your hands — you know as it is super stinky it is clean — it should n’t be planted with by you right a way. You have to age or compost it. Family and your neighbors might disown you, but your plants will love you for this.
Using Clean Manure
Spread within the backyard area, implementing around 4 lbs for every 10 feet. Horse and so are usually accessible for the typical gardener from an area farm and cow manure perform properly in the house garden.
Wait to allow the age that is manure the microorganisms have time as well as therefore it decomposes. What this means is, for fall plantings, you need to apply the manure in the spring. For spring plantings, you need to apply the manure in the fall.
Work the manure that is decomposed to the soil 6 to 8″ deep. Use shovel a garden fork or spade. For big gardens, you may want to hire a tiller. Plant your backyard as typical.
Composting or Ageing Manure
Add manure or pile and include 10% extra sawdust, woodchips or dried leaves to reduce the odor.
Irrigate and change the pile. It’s going to kill most weed seeds in the event the manure reaches 145 degrees Fahrenheit. To kill pathogens including E. Coli piles should achieve 130 to 140-degrees Fahrenheit temperatures for at least five times on two independent events. The pile should be turned between these two events.
Wait for the manure to completely decompose. The finish product can smell like clean earth and is going to be black and crumbly. This may take six to eight weeks if you’re composting in the hotter months.
Turn the 6 to 8″ to the s Oil, utilizing it as a s Oil amendment to enhance drainage and boost water-retention in the backyard. Wait a-T least a month but Colorado State-University recommends 8 weeks, waiting.

The best way to Grow Puffball Mushrooms
January 28, 2018
Mushroom is the title to get a big team of mushrooms with features that are comparable. Unlike typical mushrooms, puffballs have no exterior gills plus their spores are produced by them . Mushrooms feed and develop in another manner from other kinds of mushrooms, in order that they are challenging to develop. With developing puffballs anymore than you’re guaranteed success when looking mushrooms you’re not assured success. The fun is in the seeking.
As soon as they’ve turned brown pick the mushrooms. This can be an indication the puffballs are stuffed with spores. Cut off the puffballs in the bottom using a sharp knife and place them to to put on any spores that will pop out.
Fill a gallon- glass jar with non-chlorinated water or water. Add a pinch of salt as well as a little spoonful of molasses . Stir the mixture using a wooden spoon.
Hold the puff-ball on the jar opening and squeeze it therefore the spores puff to the jar, or pop it. Shake the puff-ball that is empty and brush the spores to the water off the paper towel. Place the lid and place the jar in an area where it will not be disturbed for two times.
Pour the slurry that is resulting out onto the garden in the location where you discovered the puffballs. The reality this area is welcoming to puffballs will improve your odds of developing a new-generation of these.
Parsnips & Companion Planting
January 23, 2018
Parsnips are a yearly root vegetable that prosper in soil of 60 to 65 degrees Fahrenheit. Parsnips are pale in colour using sweet taste and a citrusy scent. They can be served pack a punch of important vitamins and minerals and cooked. As you prepare to plant your backyard, crops and other root veggies help parsnip wellness when they have been planted. These crops that were helping are called companion crops.
About Companion Planting
A companion plant supports plants in your backyard, making harmony. A backyard that is well-balanced is healthier with companion planting and arranged. You can find veggies, herbs, fruits and lots of flowers that thrive when developed in the same area. Companion crops usually prosper when planted while environment, the soil and gardening methods all decide a backyard achievement. These crops attract helpful insects that promote development and keep undesirable pests away. Sometimes, companion crops decrease the need for pesticides. Have crops that are bigger and healthiest development.
Parsnip Companions
Contain companion plantings in the mattress when you plant parsnips in your backyard. Companion crops contain root vegetables like potatoes, onions, garlic and radishes. Parsnips prosper with bush beans, peppers and peas in the same bed. These crops keep pests away and help the wellness of your parsnips. Radishes keep your garden free of cucumber beetles. Onions keep aphids and ants away. Aphids are also kept by garlic a way, as well as mosquitoes. When garlic is current, flea beetles, which are fairly unusual except in hotter zones of the Bay Region, also avoid. Keeping away bugs normally with companion plantings signifies that you’re likely to need to use insecticides.
The Best Time to Plant
The timing of companion crops and planting parsnips differs through the year in the Bay Region. Parsnips are a full-sunlight plant that thrives through October. However, in case your home is in a community that is foggy, it’s not recommended to plant parsnips in Oct. Plant companion crops like garlic and onions . Stop planting onions in April or May in the event that your home is in a neighbor hood that is foggy. Onions thrive in the yr through November. Plant potatoes from February. Radishes are a companion plant of the parsnip that thrives yearround. In neighborhoods that are foggy, start planting peas as early as March or February; all neighborhoods should plant peas from April through November and from August to June.
Considerations
One of the one of the greatest threats to parsnips is root maggots. Root maggots are unable to be managed with companion planting, nevertheless they’ve been driven a way by sprinkling fire-place ashes around root vegetables and parsnips as you plant them in your backyard. You will find also plants which can be enemies while some crops are complementary to the parsnip. Enemy plants of the parsnip contain any plant including the larkspur. These flowers seem good in the backyard but should never be planted in the sam e mattress with parsnips.

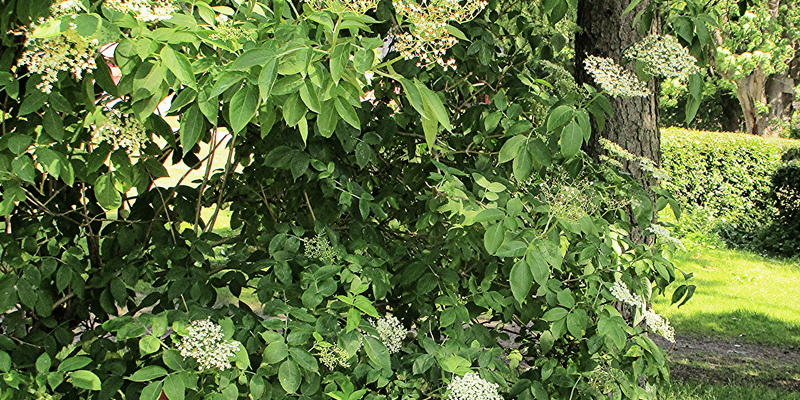
Bushes for Partial Sun
January 21, 2018
Consider your soil type in to thought too when choosing bushes to get a partly sunny area. Some bushes can grow in clay, sandy or loam soils while the others only prosper in loam. Additional aspects to consider are your Sunset Climate Zone, whether or not it requires a pollinator and the height and habits of the bush, if it generates fresh fruit. Choose a bush that can thrive with all the features you want.
Camellia Japonica
Camellia, or Camellia japonica, is a bush that grows in sunlight in 4 and Sunset Climate Zones H-1 through 2-4. They create semi-double type flowers that will be up to 5″ in diameter from late-winter to -spring. There are cultivars that remain shorter although the species grows gradually to 20-feet tall. Elegans Splendor grows to 10-feet tall and blooms in pink that is light while Professor Sargent has deep red flowers and ultimately reaches 10 to 15 feet tall. Daikagura Variegated grows to between 8 and 15 feet tall with bi-colored white flowers and red. Camellias prefer soil.
Hibiscus
Hibiscus syriacus or Rose-of- H and Sharon. Cotton or mutabilis -rose increase through 2-4 in 2 and Sunset Climate Zones H-1. H. rosa-sinensis or tropical hibiscus grows in zones H1, H2, 9, 12 through 16 and 19 through 24. All of them thrive in partial sunlight. Rose-of- Cotton and Sharon -rose bloom in fall and summer, creating aromatic red, purple, pink or white flowers. The Rose-of- most cultivars create single and Sharon species – increase to 12-feet tall and type flowers but the Lucy cultivar creates double-type pink flowers that are dark. H. syriacus âDianaâ is a white-flowered cultivar that grows to 8-feet tall. Cotton-rosebushes create single-type flowers both in one or clusters per stem. They’re white at first then change to shades of blue and pink -lavender. Tropical bloom year round, creating single- double or type -type flowers. H. syriacus and H. Mutabilis shrubs thrive in sandy soil, loam or clay. H. Rosa-sinensis grows well in sandy soil or loam.
Ilex
Ilex species, generally called bushes, prosper in sandy soil or loam and increase in partial sunlight. I. cornuta âBurfordiiâ or Burford holly grows to between 8 and 20-feet tall in Sunset Climate Zones 4 through 2-4. I. vomitoria âCarolina Rubyâ grows to 4-feet tall in zones H1, H 2 and 4 through 24, tolerates drought and salt and can grow in clay soil. Hollies create tiny white flowers in early summer or the spring followed by red berries that birds consume. Burfords and Carolina Ruby are dioecious, as are most hollies â which means there are male and female plants. A holly should be planted near feminine hollies for fresh fruit production.
Loropetalum chinense
Loropetalum chinense or fringe flower grows in partial sunlight in Sunset Climate Zones H1, 6, 7, 8, 9 and 14 through 24. They prosper in loamy s Oil but will increase in clay-loam or sandy-loam. Following the bush becomes established it’s drought-tolerant. All these are fast growing shrubs having a mature peak of 6 to 10-feet. They bloom from late-winter before the finish of spring with r e-bloom through the entire summer. The species crops generate clusters of white flowers that resemble fringe however there are hybrids that bloom in red or pink. L. chinense var. Rubrum blooms in pink that is dark. Its Blush cultivar h-AS burgundy- leaves when they first arise and blooms in burgundy-pink. Actually Red or the Chang Nian Hong blooms in vibrant cherry-red and h-AS burgundy to dusky dark-green foliage.
The best way to Clear Land for Landscaping
January 15, 2018
The times when you can rent some equipment that was heavy and flail away till you were down to bare dirt are over in many municipalities. Suburban and sub-rural homeowners are are required to adhere to protected and run off species laws as a contractor should. While compliance may be difficult at times, the up side is that the job can really be physically simpler and result in less erosion, soil construction and permitting charges that are lower. The end result is a better looking greater attractiveness, a simpler landscaping work and house to potential customers. In the event that you are ready to consider your time and prevent main earth-shifting, you’re unlikely to require permits in any way.
Create a cautious study of the kinds of crops as well as the location you want to clear and take notice of huge rocks or logs you want to eliminate. Be conscious of the existence of endangered indigenous plants and steep slopes which could result in erosion run off issues if you’re clearing land in a community. It probably doesn’t include any species you require to worry about — in the event the area you’re clearing has previously been disturbed — a current development zone, for instance. Determine which rocks and trees you might want to keep for potential landscaping. Retention of bigger trees whenever we can is usually aplus for homeowners. They supply a center piece along with privacy and shade to get a house.
Search nearby and state laws on the web which could affect that which it is possible to do and modify your clearance program appropriately. California, as an example, h-AS some protections for oak trees that are healthful, but demands removing of trees which are dying from oak fungus or infestations.
Visit metropolis or your county permitting authority to find out what paper-work you require to file and what sorts of permits you’ll need. In the event you program to do considerable clearing, you could possibly need an allow, if a plan could be looked at as a modification of present vegetation, or your lot is le Vel and tiny, you might not require an allow. In lots of states, regulation requires vegetation administration for fire-protection and proprietors are broadly speaking not anticipated to spend allow costs to obvious.
Cut the bushes and little trees using a chainsaw down. A tiny tree is one you could cut through from your ground and never having to make aspect wedges when it falls, and which will do-no harm to constructions or autos. Avoid lowering huge trees only at that time and do use hearing and eye safety when utilizing a chain saw. For chipping cut brush close to the floor as possible and create a pile close to your driveway or accessibility street. You could need to cut trees that are little twice: once a-T and once a couple of feet over the floor or near-ground level. Try perhaps not to enable the chain-saw blade as this will dry up the chain to reduce in to dirt and dull tooth rapidly.
Shove the digging bar to the ground and beneath the stump of a bush you reduce down, and drive the most effective end and to pop the stump from the ground. You might have to perform it around a bit plus it aids to wait until after the floor is softened by an excellent rainfall. Use a sledge-hammer to pound it in to the floor under the stump in the event you can’t-get the conclusion of the bar under the stump effortlessly. Repeat with every one of the shrubs you reduce all the way down to keep them from growing straight back out from the stumps.
Uproot and eliminate rocks as-needed, nevertheless utilizing the digging bar, where you require them to be and spot them. You generate a kids perform location can use rocks later to accent landscaping or construct a wall on a slope.
Cut herbaceous grasses and weeds to the s Oil area using a string trimmer, leaving the roots in the s Oil to pro Tect from erosion before you’re prepared to place in decorative crops, and preserve s Oil fertility. The exception to the rule is other or mustard pest crops that are persistent. Pull on some gloves so that they will not haunt your potential landscape and t-AKE these out. Depending in your goals, here is the time to workout some judgment. For those who have guarded crops, or plants which you wish to incorporate right into a potential landscape program, consider leaving them alone. Leave the plant tops that are cut on the floor to to behave as a mulch that is short-term.
Hire a tree removing specialist to take large trees out. Removal of trees that are huge demands branch get a handle on products and unique climbing, as well as the coaching to use it securely and properly. It needs talent to a void injuries and property-damage and is a harmful career.
Feed tree cuttings and your brush by way of a chipper and keep the chips. It’s possible for you to rent a chipper or appear to get a free or reduced cost chipping plan. The latter have become several in fire-prone are as, for example California. Layer it to aid include erosion it’s possible for you to use wood-chips to discourage weed re-growth or distribute it on a dirt driveway for dust get a grip on and traction.